2021. 8. 3. 21:32ㆍgolang/golang-webServer
그럼 1편에 이어서 go 서버를 실제로 만들어 보겠습니다.
[golang/golang-webServer] - go-grpc-gateway(1) proto 작성해보기
go-grpc-gateway(1) proto 작성해보기
go-grpc-gateway golang을 활용해서 서버를 만들다가 go 서버간의 통신을 grpc를 사용하도록 확정했다. 하지만 몇가지 문제점이 있었다. 문제점 1. Client 친구가 rest로 모를뿐더러 grpc를 배우기엔 부담스
hoony-gunputer.tistory.com
우선 시작하기 전에 앞서 얘기했던 golang 라이브러리를 설치해야합니다. (1)의 과정을 완료했다면 terminal에 go mod tidy만 입력하면 필요한 라이브러리를 모두 설치할 수 있습니다.
package main

import (
	hoonypb "goGateway/proto/hoony"
)

type Server struct {
	hoonypb.UnimplementedChattingServerServer
}

func main() {
}
구조체에는 만들어준 서비스 이름을 바탕으로 만들어진 Server를 만들어줍니다.
func main() {
	Server := &Server{}
	lis, err := net.Listen("tcp", ":8080")

	if err != nil {
		log.Fatalln("Failed to listen:", err)
	}

	s := grpc.NewServer()

	hoonypb.RegisterChattingServerServer(s, Server)

	go func() {
		log.Fatalln(s.Serve(lis))
	}()

	conn, err := grpc.DialContext(
		context.Background(),
		"0.0.0.0:8080",
		grpc.WithBlock(),
		grpc.WithInsecure(),
	)

	if err != nil {
		log.Fatalln("Failed to dial server:", err)
	}

	gwmux := runtime.NewServeMux()

	err = hoonypb.RegisterChattingServerHandler(context.Background(), gwmux, conn)

	if err != nil {
		log.Fatalln("Failed to register gateway:", err)
	}

	mux := http.NewServeMux()
	mux.Handle("/", gwmux)

	gwServer := &http.Server{
		Addr:    ":8090",
		Handler: mux,
	}

	log.Println("Serving gRPC-Gateway on http://0.0.0.0:8090")
	log.Fatalln(gwServer.ListenAndServe())
}
위의 소스 코드는 전체 코드입니다. 코드 하나하나가 어떤 역할을 하는지 알아 봅시다. 우선 중요하게 생각할 점은 grpc-gateway의 겨우에는 두개의 서버를 활용한다는 점입니다. 앞서 rest의 요청을 받는 서버와 요청을 받아 grpc와 통신할 수 있는 서버를 의미합니다.
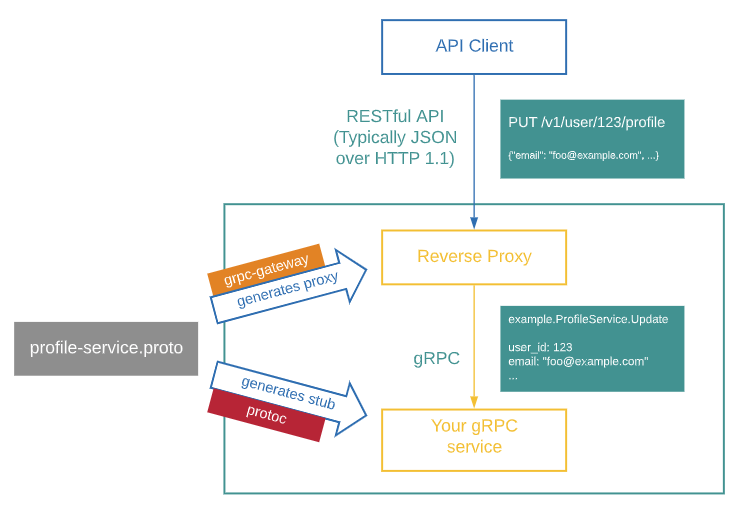
위 사진에서 지금 만드는 8080포트를 사용하는 서버는 gRPC service이고 8090은 Reverse Proxy입니다. 그리고 이 서버 사이에 통신하기 위해서 context를 사용한다.
err = hoonypb.RegisterChattingServerHandler(context.Background(), gwmux, conn)여기서 context를 등록 후 reverse proxy는 gRPC 서버로 부터 Done이라는 메시지를 받게 되면 connection은 종료되게 됩니다.
conn, err := grpc.DialContext(
		context.Background(),
		"0.0.0.0:8080",
		grpc.WithBlock(),
		grpc.WithInsecure(),
	)
또한 위 코드의 conn 변수를 만들었습니다. rest요청이 들어올 시에 grpc.DialContext를 사용해서 reverseProxy가 gRPC 서버에 요청을 보낼 수 있습니다.
또한 이러한 기능이 가능하게 되는 것은 아래의 코드에서 만들어준 gwmux라는 변수를 각 함수에 등록시켜주고 있기 때문입니다.
gwmux := runtime.NewServeMux()

mux := http.NewServeMux()
mux.Handle("/", gwmux)
mux.Handle에 gwmux를 등록시켜서 rest 요청이 들어올 때 마다 proto에 작성해준 요청에 맞게 연결시켜줍니다.
그럼 지금 부터는 proto에 작성해준 rpc를 구현해보겠습니다.
service ChattingServer{
    rpc SendMessage(MessageRequest) returns(MessageResponse){
        option (google.api.http) = {
            post: "/message"
        };
    }

    rpc ReceiveUsers(UserRequest) returns(UserResponse){
        option (google.api.http) = {
            get: "/user"
        };
    }
}
필자는 위의 두개의 구현 파일을 갖고 있기 때문에 요청을 받고 반환하는 방식으로 코드를 구성해보겠습니다.
type Server struct {
	hoonypb.UnimplementedChattingServerServer
}

func (s *Server) SendMessage(ctx context.Context, in *hoonypb.MessageRequest) (*hoonypb.MessageResponse, error) {

}

func (s *Server) ReceiveUsers(ctx context.Context, in *hoonypb.UserRequest) (*hoonypb.UserResponse, error) {

}
Server의 struct의 메소드로 만들어서 요청을 받거나 반환을 해줄 수 있습니다.
필자의 경우에는 아래와 같이 메소드를 만들었다.
func (s *Server) SendMessage(ctx context.Context, in *hoonypb.MessageRequest) (*hoonypb.MessageResponse, error) {
	fmt.Println(in)
	status := &hoonypb.Status{StatusCode: 200, StatusMessage: "메시지 전송을 완료했습니다."}
	return &hoonypb.MessageResponse{Status: status, Content: "안녕", ReceiverId: []string{"1234", "12345"}}, nil
}

func (s *Server) ReceiveUsers(ctx context.Context, in *hoonypb.UserRequest) (*hoonypb.UserResponse, error) {
	fmt.Println(in)
	status := &hoonypb.Status{StatusCode: 200, StatusMessage: "메시지 전송을 완료했습니다."}
	return &hoonypb.UserResponse{Status: status, Name: "hoony"}, nil
}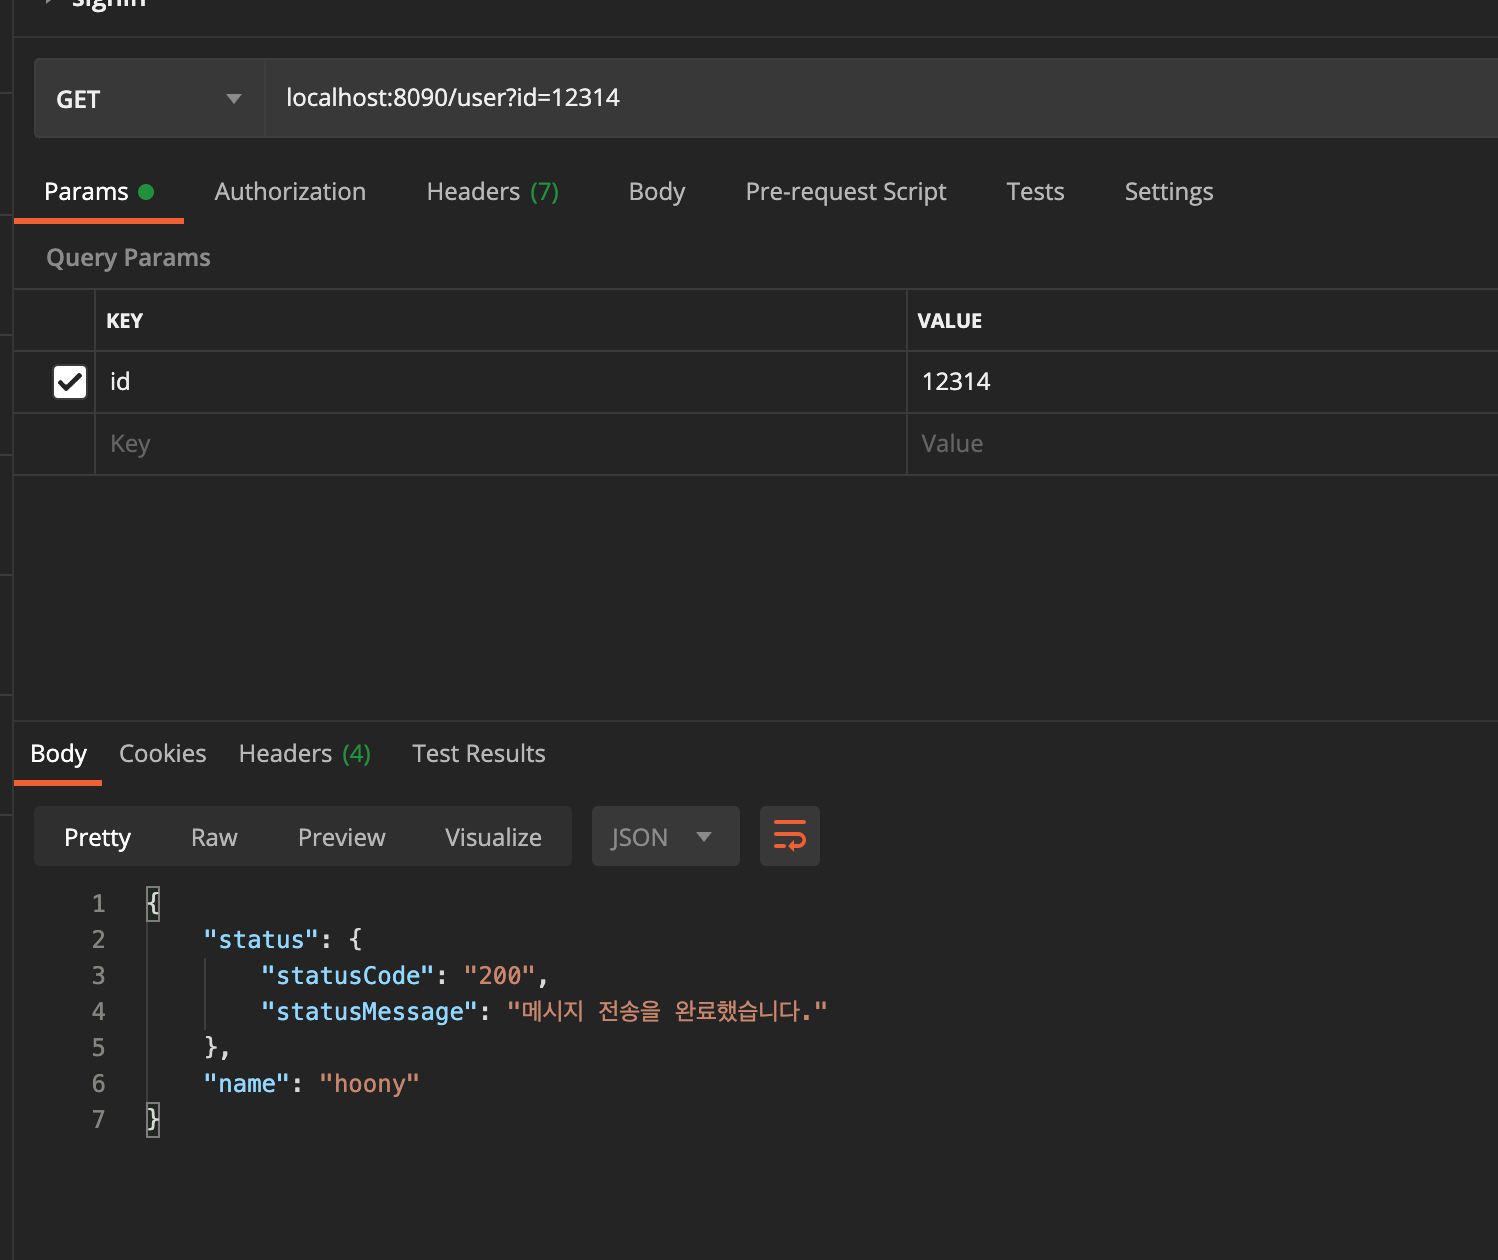
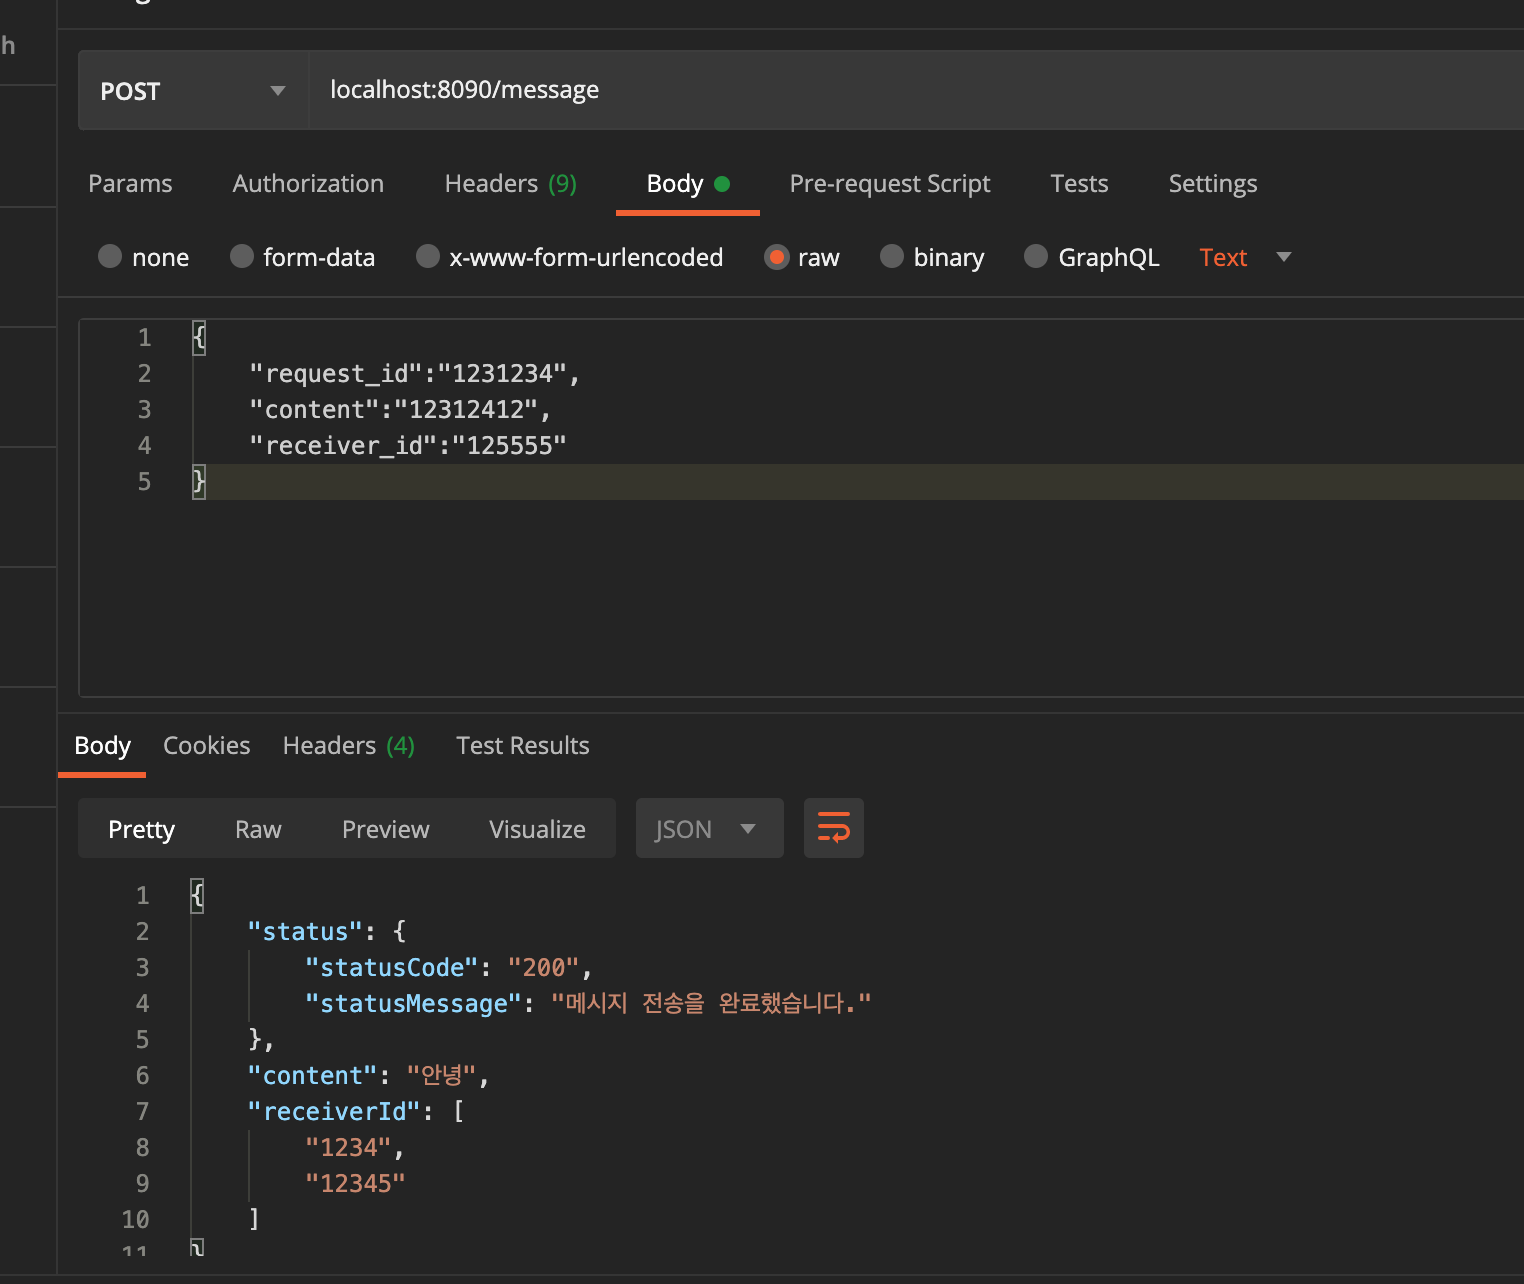
그리고 위의 postman을 활용해서 테스트 해보면 잘 작동하는 것을 알 수 있다. 그리고 또 반환해주는 결과를 보면 딱 맞게 반환해주는 것을 볼 수 있다.
다음 글에서는 중간에 다양한 기능을 추가해서 넣을 수 있는 플러그인을 사용해보겠습니다.
'golang > golang-webServer' 카테고리의 다른 글
| go-grpc-gateway(1) proto 작성해보기 (0) | 2021.08.02 |
|---|---|
| golang http Server Router 설정하기 (0) | 2020.04.16 |
| golang http server 시작하기 (0) | 2020.04.16 |